Ribbon Earphones
(Inspired by “Tokyo mew mew”)
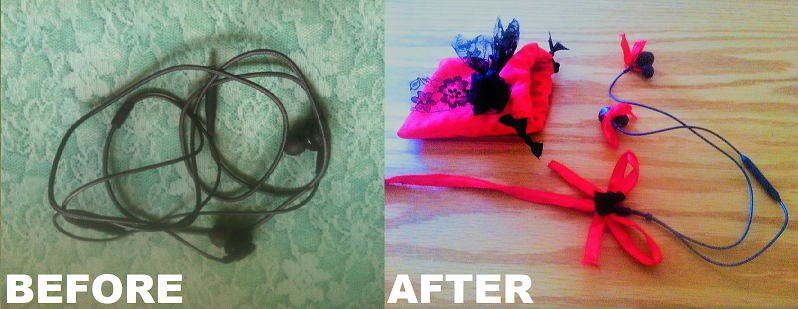
So, who out there owns shoelace earphones? Or maybe you’d like a pair but are to financially aware to fall into that marketing scam?
Well the solution is finally here. You can stop binning pair after pair of cheap overpriced earphones and make your own shoelace earphones using “Apple” or “Samsung”. With just a few hours of work you will finally have good quality shoelace headphones. Yey!!! Who doesn’t love a good DIY hack?
I know I do that’s why when my class mates started wearing shoelace headphones I knew I had to take it a step further and advance to ribbon. These earphones are super cute and really different so you’ll either love them or hate them. And that’s fine you’re entitled to your own opinion but if you’re up for it give it your all and rock them.
This project may be more expensive up front but really pays of in the long run. Mine are based of “Tokyo mew mew” as the red ribbon reminded me of “Zoey/Ichigo.” link to the Wikia fandom will be listed at the end of this post if you wish to find out more.
so now let’s go ahead and get started
MATERIALS
Samsung/Apple headphones
Ribbon at least 10mm wide or shoelaces
Cat button optional
How to Make
1. Take your apple/Samsung earphones and cut two lengths of shoelace the length of your earphones (before they split in two)
2. pin the two shoelaces together zig-zag stitch along one side leaving the other open.
Depending whether you’re using shoelaces or ribbon there’s two ways you can do this.
Note if your shoelaces are 10mm wide you will need to follow the Ribbon instructions.
If using shoelaces
3. Zig-zag stitch along the second edge of the ribbon leaving an opening at the top and bottom creating a tube.
4. Thread your earphones plug in first throw the tube until it comes out the other end .
5. smooth and tease the shoelaces so there not gathered.
6. stitch the bottom and the top end together around the cable
If using Ribbon 10mm wide
7. Place the earphones inside the two stitched ribbons and carefully and cautiously pin the other side together
8. hand sew along the length of ribbon using overcast stich.
9. overcast the bottom and top of the ribbon holding the cable in place
To Decorate
To recreate the ones above.
Earpiece mini bows
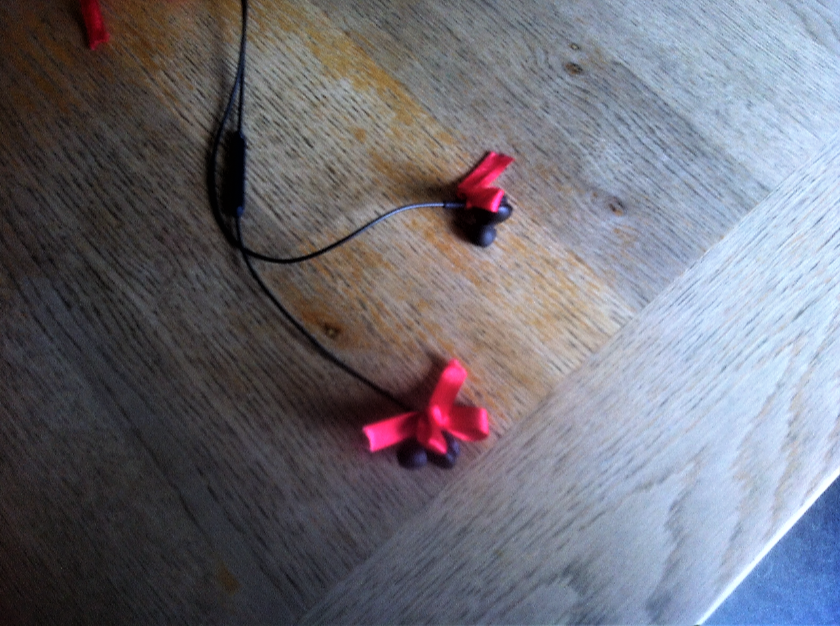
10. Cut two smaller pieces of ribbon and tie two mini bows.
11. Attach these in place by sewing through the back of the bow and in a loop around the earpiece
Center bow
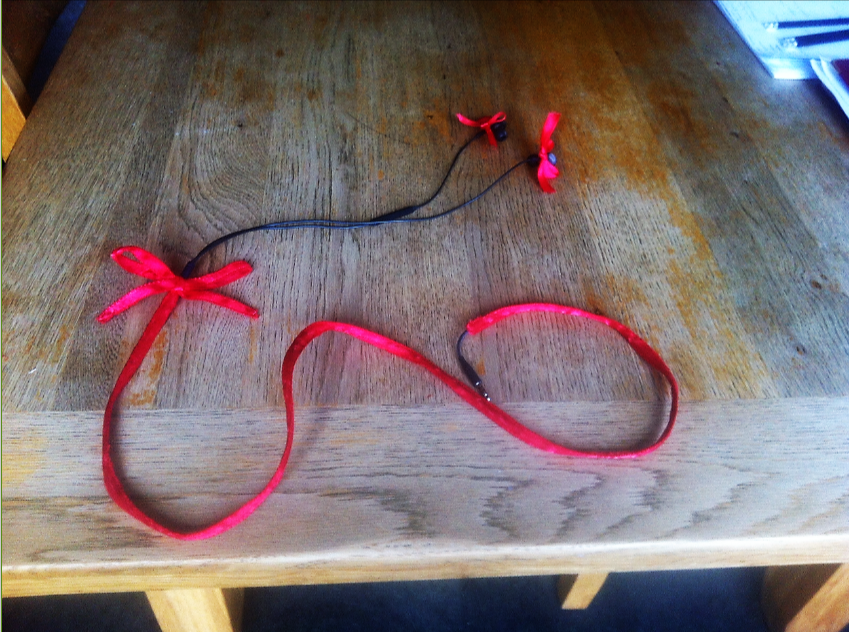
12. Using left over cuts of ribbon tie a large bow and stich in place onto the top of the ribbon tube at the base of the split in your headphones.

13. Personally, I added a velvet black cat button to the centre of the bow as the red ribbon reminded me of “Ichigo”. The button represents her transformation shown in the link for the wikia fandom.
“Tokyo mew mew” or known as “mew mew power” as shown in the uk’s star character “Zoey” is listed below as I didn’t want to post any pictures of her as I’m cautious of the fact its illegal to use other people’s work of the internet and its an anime so will be protected by copyright. into a little black kitty. Once again link is at end so if you wanna check her out go ahead.
So, there you have it. Hope you enjoy making these earphones as much as I did, tell me how it turns out in the comments below. Have fun crafting xx
“Tokyo Mew Mew”
The link for the wikia fandom “Tokyo mew mew” or known as “mew mew power” as shown in the uks star character “Zoey” is listed below as I didn’t want to post any pictures of her as I’m causious of the fact it’s illegal to use other people’s work of the internet and it’s an anime so will be protected by copyright.
http://tokyomewmewpower.wikia.com/wiki/Ichigo_Momomiya